General Support Articles
- Change Windows Hello Pin
- Adding or removing an Email Account from Windows (Outlook)
- How to set up your Microsoft 365 sign-in security
Change Windows Hello Pin
Change or reset your PIN when you're already signed in
You can use the Settings app to change your PIN.
-
In the Settings app on your Windows device, select Accounts > Sign-in options or use the following shortcut:
-
Select PIN (Windows Hello) > Change PIN and then follow the instructions. You must enter your old PIN in order to change to a new one
-
If you forgot your PIN, select I forgot my PIN and follow the directions to verify your account and create a new one.
Adding or removing an Email Account from Windows (Outlook)
These steps are the same whether you're adding your first email account or additional email accounts to classic Outlook for Windows.
-
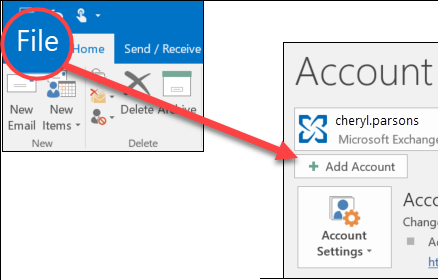
Select File > Add Account.

-
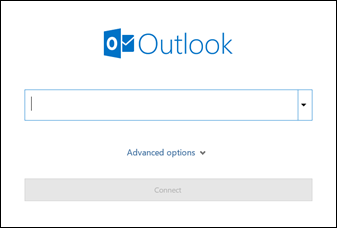
Enter your email address and click Connect.

-
If prompted, enter your password again, then select OK > Finish to start using your email account in classic Outlook for Windows.
Remove an account
Removing an email account from classic Outlook for Windows doesn't deactivate the email account. If you want to deactivate your account, talk to your email account provider. Once you delete an account from classic Outlook, you'll no longer be able to send and receive mail from that account in Outlook.
-
In classic Outlook for Windows, select File.
-
Select Account Settings > Account Settings.
-
Select the account you want to delete, then select Remove.
-
You'll see a message warning you that all offline cached content for this account will be deleted. This only affects content downloaded and stored on your computer.
-
Select Yes to confirm.
How to set up your Microsoft 365 sign-in security
Signing in for the first time and setting up the Microsoft Authenticator app on your phone
Your Microsoft 365 account (your work email, Teams and files) is protected by a second check when you sign in. This is often called MFA (multi-factor authentication). It simply means that as well as your password, you tap a button on your phone to prove it is really you. This guide walks you through setting it up the first time you sign in. It takes about 10 minutes.
Before you start
- Have your new work email address and temporary password ready. These are the details Tranquil IT or your manager gave you.
- Have your smartphone (iPhone or Android) with you, switched on and connected to the internet (Wi-Fi or mobile data).
- Know your phone's App Store or Google Play password, as you will need to download a free app.
- Sit at your computer. You will use the computer and the phone together, so keep both close by.
Part 1: Get the Microsoft Authenticator app on your phone
Do this first, on your phone.
On an iPhone, tap App Store. On an Android phone, tap Play Store.

App Store (iPhone) and Play Store (Android)
Tap Search and type Microsoft Authenticator.
Find Microsoft Authenticator in the list. It has this blue padlock-and-person icon and says Microsoft Corporation underneath.

The Microsoft Authenticator app icon
Important: Only download the app made by Microsoft Corporation. Other apps with similar names are not the right one.
Tap Get (iPhone) or Install (Android). The app downloads onto your phone.
When it has finished, tap Open.
If the app asks whether it can send you notifications, tap Allow.
Note: Notifications are how the app tells you someone is signing in. The setup will not work properly if you tap Don't Allow.
If the app shows a welcome or privacy screen, tap Accept and then Continue. You can tap Skip on any screen that asks you to sign in or add an account for now.
Note: Leave the app installed. You will come back to it in Part 4.
Part 2: Sign in for the first time
Now switch to your computer. Open your web browser (the program you use to go on the internet). It will look like one of these icons.

Google Chrome, Microsoft Edge, Firefox, Opera and Safari
Click in the address bar at the very top of the window, type office.com and press Enter.

office.com typed into the address bar
Click Sign in.

The Sign in button on the office.com page
Type your work email address and click Next.

The Sign in box with an email address typed in
Type your temporary password in the Password box and click Sign in.

The Enter password screen
Tip: Passwords are case sensitive, so capital letters matter. If it will not accept it, check the Caps Lock key is not switched on.
You may see Update your password. If you do, type your temporary password in the Current password box.
Type a new password of your choice in the New password box, then type it again in the Confirm password box.
Click Sign in.
Note: Choose a password you will remember but others would not guess. A good trick is three random words joined together, for example CoffeeRiverLamp. Never write it on a note stuck to your screen.
Part 3: Start the security setup
A screen says Let's keep your account secure. Click Next.

The Let's keep your account secure screen
Note: This is expected. It is not an error and nothing is wrong with your account.
The next screen says Install Microsoft Authenticator. You already did this in Part 1, so click Next.

The Install Microsoft Authenticator screen
The next screen says Set up your account in app. Click Next.

The Set up your account in app screen
A screen says Scan the QR code and shows a square black-and-white pattern. Leave this screen open on your computer.

The Scan the QR code screen
Important: Do not click Next yet. You need to scan this code with your phone first (Part 4).
Part 4: Add your work account to the app
Pick up your phone again, keeping the QR code showing on your computer. Open the Authenticator app on your phone.
Tap Add account. (If the app already has other accounts in it, tap the + symbol in the top-right corner instead.)

The Add account button
Tap Work or school account.

Work or school account in the list
Tap Scan a QR code.

Scan a QR code
If the phone asks whether the app can use your camera, tap Allow (or OK).
Note: The app only uses the camera to read the QR code. It does not take or keep any photos.
Point your phone's camera at the QR code on your computer screen, so the code fits inside the square on your phone.
The phone reads the code by itself. Your work account now appears in the app, showing your company name and your email address.
Tip: If the camera will not read the code, move the phone a little closer or further away. If it still will not work, click Can't scan the QR code? on your computer and call us.
Part 5: Test it and finish
Go back to your computer and click Next under the QR code.
A screen says Let's try it out and shows a number (in this picture it is 59, yours will be different). Keep this screen open.

The Let's try it out screen showing the number
On your phone, a message pops up asking Are you trying to sign in? Tap it to open it.
Type the number shown on your computer screen into the box on your phone.
Tap Yes (or Approve). Your phone may ask for your fingerprint, face or phone PIN to confirm.
Note: This is your phone's own lock, the same one you use to unlock it. Tranquil IT cannot see your fingerprint or face.
Your computer shows Authenticator Added with a green tick. Click Done.

The Authenticator Added screen
Note: That is it. Your account is now protected. If you are asked Stay signed in?, click Yes on your own work computer, or No on a shared or public computer.
Good to know
- From now on, when you sign in on a new computer or phone, you will see a number on the screen. Open Authenticator, type the number and tap Yes. You will not be asked every time on the same computer.
- Never tap Yes on a request you did not start yourself. If that happens, tap No, it's not me and call us straight away. Nobody from Tranquil IT or Microsoft will ever ask you to approve a request for them.
- Getting a new phone? Please call us before you reset or hand back your old phone, so we can move your account across without you getting locked out.
- Keep your phone's own lock (PIN, fingerprint or face) switched on, so nobody else can approve requests.
Need help?
If something does not look the way this guide describes, or you get stuck, call the Tranquil IT support team on 01279 658331 or email support@tranquilit.net and we will be happy to help.